
Series · GNTECH Infrastructure Deployment Series · Part 10 of 12 · Previous: Part 09 — Docker Compose and Traefik · Next: Part 11 — Monitoring and Observability
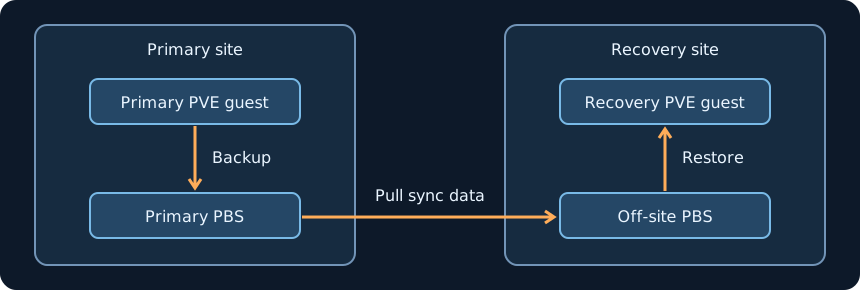
A successful backup job tells you the primary datastore accepted a backup. To rehearse a site outage, start at the other end. Can a recovery host reach the off-site datastore, decrypt the right snapshot, and boot a usable guest without calling back to the primary site?
This lab assumes Proxmox VE 9, two Proxmox Backup Server (PBS) 4 installations, and a disposable Linux VM with one virtual disk and one NIC. The recovery host belongs to a separate cluster or is standalone, with enough local capacity for the restored disk. The commands and outcomes below are a drill procedure. Use the PBS setup guide to connect the primary PVE host to PBS before starting.
1. Prepare a recovery point you can recognize
Use the console of the disposable VM to write a marker immediately before creating a backup. The marker gives you a timestamp and a checksum to compare after the restore.
|
|
Save both outputs outside the primary site. In PVE, select the disposable VM, open Backup → Backup now, and select the primary PBS storage. Use Stop mode for this lab so the guest is stopped for the backup. Record the backup’s timestamp and confirm that the task completes. For production applications, define consistency checks for the application itself, such as opening a restored database and reading a known record.
A local ZFS snapshot can shorten rollback after a bad change. It shares the source pool’s failure boundary. Use the PBS copy for this drill, where the source pool and its snapshots are assumed unavailable.
2. Pull that backup to the recovery site
On off-site PBS, add the primary PBS under Configuration → Remotes. Verify the remote certificate fingerprint through a trusted channel. Give the sync identity read access only to the source namespace it needs. In the off-site datastore’s Sync Jobs, create a pull job with the source datastore and namespace, target namespace, and a group filter for the disposable VM. For example, use group:vm/120 if the lab VM ID is 120.
Leave Remove Vanished disabled so source-side deletion does not instruct this job to remove the target snapshot. Set retention separately at the recovery site. Prune jobs expire snapshots, while garbage collection reclaims unreferenced chunk space on its own schedule.
Run the pull job. On off-site PBS, open Content and match the VM group and exact snapshot timestamp. Verify that snapshot there and record the result. A failed verification, missing snapshot, or wrong timestamp ends the drill at this step. Investigate the sync scope, job log, and target verification log before attempting a restore.
3. Restore from off-site storage alone
Start the timer. Use a recovery host that has no route to the primary site, or restrict the drill to a recovery network with that property. Keep the original workload running normally. On the recovery PVE host, add the off-site PBS via Datacenter → Storage → Add → Proxmox Backup Server. Use its datastore and namespace, a scoped read credential, and its independently verified TLS identity. If the snapshot was client-side encrypted, import the original matching encryption key from your recovery kit. A new key cannot decrypt the old snapshot.
Select the verified timestamp on the off-site storage, choose Restore, and pick an unused VM ID and local destination storage. Leave Start after restore unchecked and leave Live restore disabled for this exercise. The disk should be fully restored before the first boot.
On the recovery node, inspect the restored configuration before boot. The example below assumes you chose VM ID 9120 and that the disposable VM has only net0. Stop and review the config if it has extra NICs, passthrough devices, or other host-bound resources.
|
|
After verifying the VM ID, stopped status, and single-NIC configuration, remove that NIC and disable boot on host startup.
|
|
Check that no netN device remains and the disk points to recovery storage. Boot the copy manually and sign in through its console with the lab guest’s local account. Re-run the marker commands as reads:
|
|
If the guest boots and both values match the saved evidence, record elapsed time and shut the copy down. Keep it isolated until the drill evidence is saved and you have confirmed its ID before cleanup. For a domain controller or another identity service, use its vendor’s recovery procedure and an isolated test network before attempting any directory or replication validation.
4. Record what passed and where you lost time
| Record | What it tells you |
|---|---|
| Timestamp of simulated outage and timestamp of the restored backup | The age of the recoverable point at the time of the drill. Sync lag can make this older than the latest primary backup. |
| Time from starting recovery to the matching marker | Observed recovery time for this guest, including credential retrieval, restore, boot, and console verification. |
| Off-site verification task and restore task IDs | Evidence for the specific snapshot and storage that served it. |
| Missing credentials, capacity, or dependencies | Fixes to make before increasing the scope of the next drill. |
A datastore that lists the VM but fails to restore may still be missing the matching key or readable backup data. A restored VM that fails to boot can have different firmware, disk, or device requirements on the recovery host. Preserve the task logs and inspect the restored configuration before changing anything on the source.
Keep a recovery kit outside both the source cluster and the identity service you may need to restore. Record where to find the datastore and namespace, trusted TLS information, restore credentials, encryption keys and any passphrases, local console access, and the guest startup order. Part 11 will turn backup age and job failures into signals you can monitor before a drill.