Series: GNTECH Infrastructure Deployment Series · Part 02 of 12 · Previous: Part 01 — Architecture and Design · Next: Part 03 — Two MikroTik CHR Routers
A remote hypervisor is different from a Proxmox box at home: if you lose its WAN route or firewall access, there is no keyboard you can simply plug in. Before deploying a router VM, prove that the host can be managed and recovered independently.
This article walks through a generic, reproducible Hetzner dedicated-server foundation modeled on the GNTECH topology. It intentionally does not reproduce any real deployment’s public addresses, credentials, interfaces, allocated IPv6 prefix, or server identifiers. Nothing described here has been run on a live server for this article.
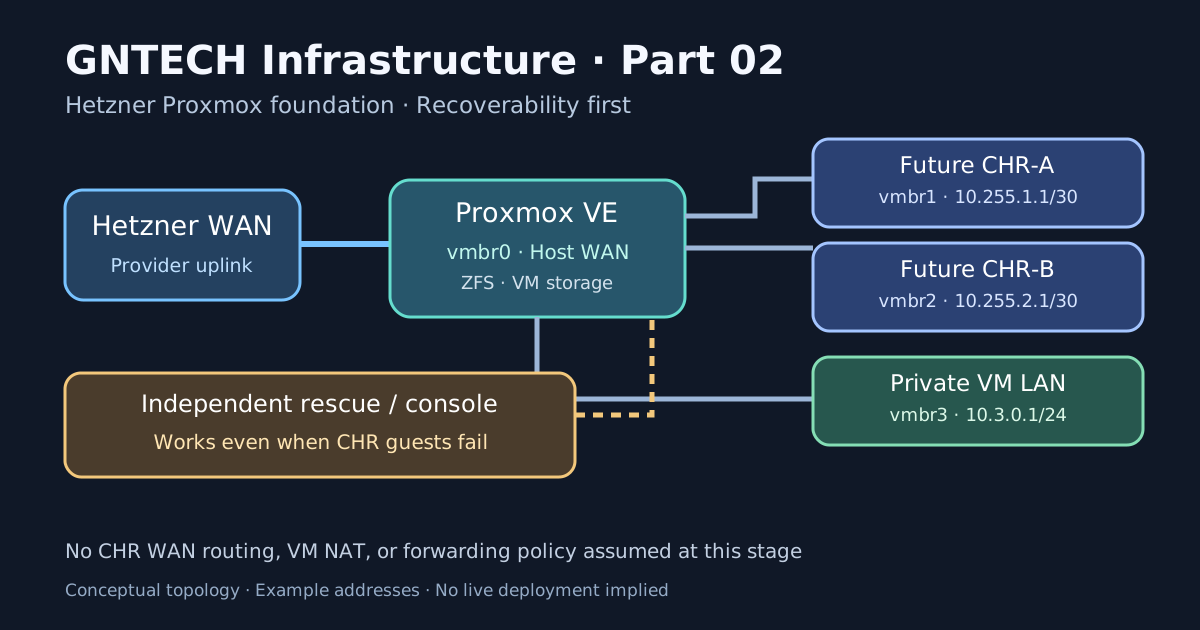
What you will build
| Component | Purpose | Example |
|---|---|---|
| Hetzner dedicated server | Bare-metal compute and provider uplink | One physical NIC |
| Proxmox VE host | VMs, storage, console, backups | DC-PVE |
vmbr0 |
Host WAN; tied to physical interface | Existing provider IPv4 and gateway |
vmbr1 |
Future CHR-A isolated transit | 10.255.1.1/30 |
vmbr2 |
Future CHR-B isolated transit | 10.255.2.1/30 |
vmbr3 |
Private VM network | 10.3.0.1/24 |
| Hetzner rescue / console | Recovery outside guest VMs | Provider-supported recovery path |
We will not configure additional public IP routing, host NAT, CHR router images, or full forwarding firewall policy here. Those belong to Parts 03 and 04. No internal bridge should imply Internet access until that policy is intentionally created.
1. Choose the installation path before touching disks
There are multiple valid installation methods for a remote dedicated server:
- Proxmox VE installer media, when your dedicated-server offering provides a suitable remote console / virtual media path.
- Supported Debian installation followed by Proxmox packages, provided you follow the current official Proxmox Debian-to-PVE instructions for the target release.
- A provider-specific installation workflow, only after checking its current bootloader, partitioning, ZFS support, and recovery implications.
Hetzner’s installimage can install supported Linux distributions from rescue mode, but it is not a universal one-command Proxmox installer and its partitioning conventions do not automatically equal Proxmox’s ZFS-root layout. Avoid mixing recipes from different installation methods.
Before installing, write down the exact Proxmox release, Debian compatibility, kernel/boot mode, planned disk layout, and console method. Back up all existing data: any OS installation or disk repartitioning can destroy it.
Official reading: Hetzner installimage and Proxmox VE documentation.
Preflight: read-only collection
Run on the existing Linux environment or rescue image before changing it. Device names and available tools can differ in rescue mode:
|
|
Stop if any disk is part of an unknown array or contains data you have not backed up. Don’t run broad wipefs, sgdisk --zap-all, or filesystem creation commands in a tutorial without selecting and verifying exact devices.
2. Decide on ZFS intentionally
ZFS is useful for snapshots, data integrity checking, and VM storage, but the vdev layout sets your failure behavior.
| Example layout | Survives one disk failing? | Trade-off |
|---|---|---|
| Single-disk ZFS | No | Simplest, no redundancy |
| Two-disk ZFS mirror | Yes, assuming the other disk remains healthy | Roughly half raw capacity |
| Two-disk ZFS stripe | No | More capacity/performance, one failed disk loses the pool |
A ZFS stripe is not RAID1. Neither snapshots nor redundant disks substitute for independent backups. If the boot pool is striped, have a tested full reinstall-and-restore procedure.
If you choose ZFS root, use an installation workflow that supports that choice and confirm bootloader/EFI handling rather than copying a partition layout from another machine. Proxmox systems may use proxmox-boot-tool; applicability depends on how the system was installed.
After installation, inspect without modifying anything:
|
|
The final command may be inapplicable for your boot setup; interpret its output alongside findmnt /boot/efi and the installer documentation.
3. Establish and document the WAN baseline
Record Hetzner’s actual main IPv4, prefix, gateway, physical-interface name, and IPv6 routing before making any edits. Hetzner networking varies between dedicated products and allocations; many configurations use a link-local IPv6 next hop and different semantics for routed subnets versus additional single IPv4 addresses.
|
|
The host’s vmbr0 WAN configuration is provider-specific. The following is only a schematic, not a paste-ready configuration:
|
|
Do not use a made-up /26, /32, gateway, or public interface name as if it came from Hetzner. Also do not introduce a second default route while moving a physical IP onto a bridge.
See Hetzner additional IP addresses and Hetzner virtualization networking. A bridged additional single-IP setup with a provider-issued virtual MAC is not the same as the routed transit model we will use later.
4. Preserve recovery access before changing networking
Prove the available Hetzner Rescue System and provider console workflow for your specific server. Have a second connection available and confirm you can authenticate without depending on a VM, MikroTik CHR, Cloudflare Tunnel, or a VPN carried by the host.
Save copies of the active configuration in a private root-only directory:
|
|
Avoid publishing the backups: even without passwords, routing and firewall rules can expose sensitive infrastructure details. A backup stored only on the machine you are changing is not an off-server recovery copy.
Remote change safety checklist
- Verify console/rescue works before the maintenance window.
- Retain the existing
vmbr0stanza until you are certain of the replacement. - Review any pending
/etc/network/interfaces.newchanges in the GUI; they may represent an un-applied edit. - Make one network change at a time; use a second active management session for verification.
- Capture the exact rollback file path and identify how it will be restored from rescue mode.
5. Add isolated bridges without changing the public WAN
On a new host where vmbr1, vmbr2, and vmbr3 do not already exist, you can prepare private bridges while leaving vmbr0 intact. First check for collisions:
|
|
Only if they are absent and the chosen subnets are unused, append the following. This is an example for hosts managed by Proxmox’s /etc/network/interfaces with ifupdown2:
|
|
Inspect exactly what changed before applying:
|
|
Only after review from the independent console, apply using the supported Proxmox workflow (GUI Apply Configuration when staging via the GUI; or ifreload -a for an already-reviewed manual edit). These examples intentionally do not automatically execute a reload.
|
|
Verify all bridges and WAN reachability from a separate management session:
|
|
An isolated bridge with bridge-ports none has no physical uplink by itself. The two CHR transit networks remain separate from each other. IPv4 forwarding, NAT, provider-routed /32 routes, and the router VMs arrive in later parts.
6. Host management hardening: avoid circular dependencies
Proxmox’s web interface listens on port 8006 by default. Never treat its login form as a substitute for limiting management exposure.
Start with a conservative access plan:
- SSH with named administrative accounts and appropriate key-based access; preserve an independently tested break-glass route.
- Proxmox RBAC and MFA, with privilege separation appropriate to the operators.
- Firewall policy limiting management to trusted sources, tested incrementally with console access.
- A Cloudflare Zero Trust path as an additional authenticated management route, not the only emergency path.
- Backups of critical host configuration plus an off-machine copy of encryption/recovery keys.
Read-only checks for current listeners and state:
|
|
Caution: changing firewall ownership between Proxmox firewall and custom nftables chains requires deliberate integration; do not flush the host ruleset or switch on a default-drop forwarding policy before planning the permitted traffic. This guide does not include a blanket firewall command.
7. Confirm storage, time, DNS, and guest capacity
The host is not ready simply because the Proxmox dashboard appears. Check:
|
|
For ZFS-backed VMs, confirm that the expected storage pool is visible through pvesm, and ensure that snapshot/backup policy is realistic given pool redundancy. A full ZFS pool can disrupt guest writes and management tasks.
For a guest smoke test, create a disposable VM only after you have verified ISO storage, available space, and network attachment. Initially attach it to vmbr3, with no assumed Internet access. Confirm local console and DHCP/static IP design. Do not mistake a lack of upstream connectivity for a broken bridge: vmbr3 intentionally has no NAT yet.
8. IPv6 is a separate design decision
Do not apply the IPv4 transit and NAT pattern to IPv6 by copying addresses or setting up NAT66 automatically.
Hetzner may provide a routed IPv6 allocation whose behavior depends on the product, assigned prefix and link-local gateway. Determine whether you can route distinct /64 prefixes to internal networks from your actual allocation. A single /64 must not be casually reused as multiple unrelated layer-2 LANs.
Before enabling IPv6 on a private bridge, record the delegated prefix, next-hop behavior, guest addressing model, and firewall policies. Inspect:
|
|
When you later enable IPv6 forwarding, ensure the host still learns or retains the provider default route correctly; router-advertisement behavior can change when a Linux system becomes a router. Validate WAN IPv6 before and after the change.
9. Acceptance tests before adding CHR
| Test | Expected | How to check |
|---|---|---|
| Host WAN IPv4 | Host is reachable independently of guests | Second management connection |
| IPv6 (if enabled) | Correct external route with no accidental LAN exposure | ip -6 route, controlled external test |
| ZFS and VM storage | Pools online; correct expected storage | zpool status, pvesm status |
vmbr1 and vmbr2 |
Distinct /30 host transit addresses | ip -br addr |
vmbr3 |
Internal VM gateway present; no unintended WAN bridge | bridge link, VM console |
| Rescue access | Available even if network guests fail | Provider console / rescue test |
| Security | Admin port access restricted to approved paths | Firewall review plus controlled probes |
| Restart persistence | Configuration remains after approved reboot | Repeat checks after maintenance |
Record results as pass, fail, or not tested, not as guesses.
10. Troubleshooting and rollback
Management disappears after a network change: use the independent rescue/console path, inspect /etc/network/interfaces, review interfaces.new, examine bridge and route state, then restore the known-good file only after confirming the rescue environment’s mount paths. Do not repeatedly run network restarts through a failing SSH connection.
Host can ping IPv4 but not IPv6: verify prefix, link-local default gateway, forwarding/RA settings, and input/forward firewall policies independently.
Storage unavailable in Proxmox: inspect zpool status, zfs list, pvesm status, and logs before changing the storage definition.
A private VM cannot reach the Internet: expected at this stage. Part 04 will add reviewed forwarding and source NAT; do not bridge vmbr3 to the provider WAN merely to bypass the routing design.
For a bridge rollback, save the now-current file for diagnosis, restore the verified copy, and reapply from recovery-capable access:
|
|
If the host’s OS or storage installation fails, rollback may require a reinstall followed by recovery from external backups, not a configuration-file reversal.
What Part 02 does and does not validate
The tutorial documents an installation decision process, read-only preflight commands, a staged private-bridge example, security boundaries, and a rollback plan. It does not claim to have run installimage, installed Proxmox on a dedicated server, exercised real Hetzner routing, configured a live firewall, or confirmed provider rescue access. Those steps require an environment-specific acceptance record.
Next: Part 03 — Two MikroTik CHR Routers, Transit Networks, and Routed Public IPs (retains its established URL).