
Series: GNTECH Infrastructure Deployment Series · Part 03 of 12 · Previous: Part 02 — Hetzner Proxmox Foundation · Next: Part 04 — Firewall and Network Isolation (planned)
A dedicated Hetzner server can host more than one virtual router without turning the Proxmox management interface into a guest-facing switch. The trick is to separate host WAN, router transit links, and ordinary VM networking, and to keep an out-of-band recovery path throughout the change.
This tutorial is a generic lab design, inspired by a real-world deployment pattern. It is not a dump of any production configuration. Do not paste the sample WAN addressing into a live server. Hetzner’s exact IPv4 routing and MAC requirements depend on the product and additional-IP allocation.
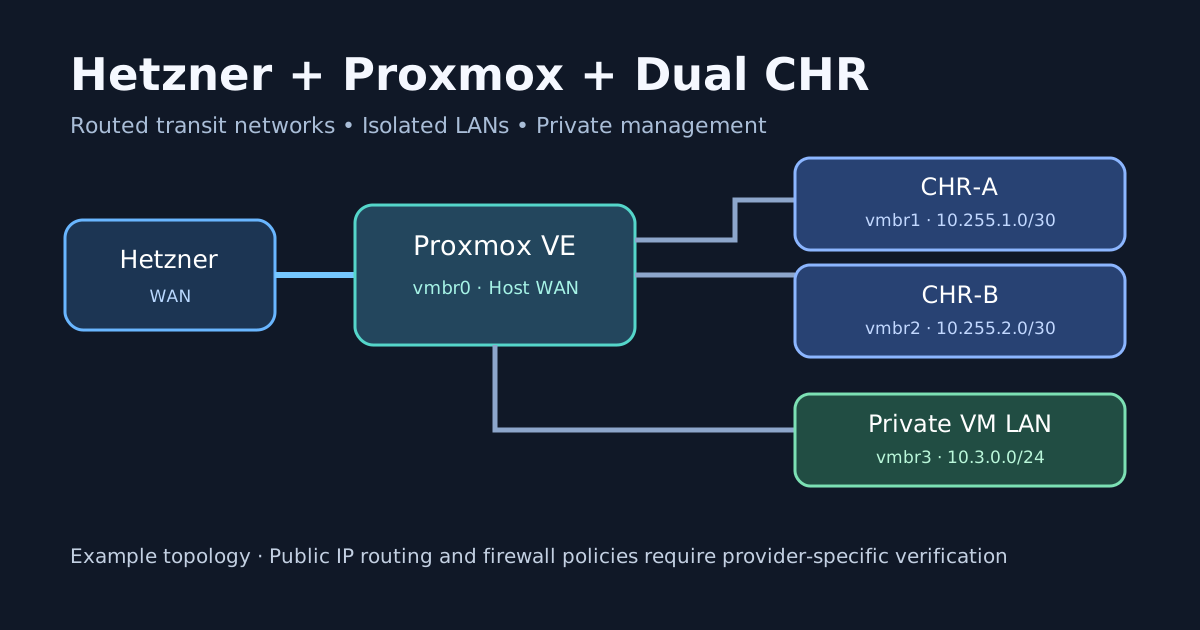
What we are building
| Network | Purpose | Example host IP | Guest endpoint |
|---|---|---|---|
vmbr0 |
Hetzner WAN and Proxmox host | Provider-assigned IPv4 | No CHR WAN bridge attachment in this routed example |
vmbr1 |
Point-to-point transit for CHR-A | 10.255.1.1/30 |
10.255.1.2/30 |
vmbr2 |
Point-to-point transit for CHR-B | 10.255.2.1/30 |
10.255.2.2/30 |
vmbr3 |
NATed general-purpose VM LAN | 10.3.0.1/24 |
10.3.0.10/24 |
Each CHR also needs a separate LAN-side interface for its own workloads. Create a dedicated internal bridge per router (for example vmbr10 and vmbr20) if you want guest networks behind each CHR; do not connect both routers’ LANs to vmbr3 and assume they are isolated.
The example uses documentation-only public addresses 192.0.2.10 (host), 198.51.100.10 (CHR-A) and 203.0.113.10 (CHR-B). These are placeholders, not routable addresses. In practice, you need two provider-routed additional IPv4 addresses or another explicitly supported routed allocation, with provider routing verified before configuring guests.
0. Preconditions and a recovery plan
Coming from Part 02? It already creates vmbr1, vmbr2, and vmbr3. Do not append their definitions again. Review the existing bridges, then add only missing vmbr10 and vmbr20 for the separate CHR workload LANs. The full firewall and NAT policy belongs to Part 04; the NAT fragment here is a preview.
Verify Hetzner’s exact additional IPv4 type, provider route, and MAC requirements before proceeding: a virtual-MAC bridging recipe is not interchangeable with routed additional IPs. See the Hetzner virtualization guide.
- A supported Proxmox VE host at Hetzner, with verified local console / rescue access.
- The existing host WAN IP, prefix, gateway, interface name, and any provider-specific route configuration recorded.
- Two additional IPv4 addresses and confirmation of how Hetzner routes them to your server. Do not assume every additional IP works with every network design.
- A tested backup of
/etc/network/interfaces, existing firewall configuration, and a working backup of the VMs you will change. - MikroTik CHR images acquired from the official MikroTik download page, and a valid license plan for your intended throughput.
Safety rule: perform bridge and firewall changes from a recovery-capable console, not from the only SSH session. Apply one stage at a time. Never blindly restart all networking on a remote host.
Inspect the existing network first:
|
|
Save a dated copy:
|
|
1. Add internal Proxmox bridges
Keep the existing vmbr0 WAN stanza unchanged. The following is an append-only illustration, not a complete replacement for /etc/network/interfaces. Check for duplicate bridge names first.
|
|
Standalone deployments only: append the complete block below only if none of these bridges exists. If following Part 02, skip the complete command and add only the missing vmbr10/vmbr20 stanzas, after checking for conflicts. Review the file before applying:
|
|
Inspect the diff, then use Proxmox’s ifreload -a from the recovery console only after validating the complete interfaces file:
|
|
Confirm that the selected dated backup is the correct baseline; do not trust an arbitrary matching backup.
2. Create two CHR guests
Download and verify the current raw disk CHR image from MikroTik. The filename and supported version change over time; do not hardcode an old release. One possible Proxmox import sequence is:
|
|
After importing, identify the unused0 volume in qm config and attach that exact volume as the boot disk using the Proxmox GUI or qm set. Set the correct boot order and inspect the console before proceeding. Repeat with a different VM ID for CHR-B, using vmbr2 and vmbr20. Disk attachment details depend on storage type; don’t guess a volume ID.
RouterOS interface names can vary. Confirm them from the CHR console:
|
|
3. Configure the transit IPs
Example for CHR-A after confirming ether1 is its transit NIC:
|
|
CHR-B uses 10.255.2.2/30 and gateway 10.255.2.1. Assign LAN IPs on each router’s second interface according to your separate network plan; avoid overlapping subnets.
4. Route the public IPs through the host
With provider routing already confirmed, the Proxmox host needs one /32 route per additional IPv4 address toward its CHR transit peer. Example commands below are not executable as written because the addresses are reserved documentation ranges:
|
|
These routes are temporary until you add matching persistent routes to the correct bridge configuration. Do not persist them until reachability and provider requirements have been verified. The router can use its assigned public /32 on a loopback interface, with outbound packets forwarded to the Proxmox transit gateway. Do not put a provider-routed /32 on a CHR WAN Ethernet interface and assume ARP will work; confirm RouterOS routing, source address, firewall, and NAT design for your provider allocation.
Enable IPv4 forwarding on the host only after reviewing its firewall policy:
|
|
Important: a route is not a firewall rule. Proxmox firewall and nftables must explicitly allow the intended forwarding paths, while blocking spoofed source addresses and unwanted lateral movement. Test this in a maintenance window. Do not add a broad ACCEPT policy to make the routers work.
5. Give the general VM LAN outbound IPv4
For vmbr3 clients, the host acts as gateway 10.3.0.1. Use source NAT only for that subnet, not for the two CHR transit subnets. Below is a minimal nftables NAT fragment, not a complete security firewall:
table ip vm_lan_nat {
    chain postrouting {
        type nat hook postrouting priority srcnat; policy accept;
        ip saddr 10.3.0.0/24 oifname "vmbr0" masquerade
    }
}
Apply this only after integrating it with your existing nftables / Proxmox firewall ownership and persistence. Avoid duplicate NAT rules from other firewalls. An outbound forwarding policy must also permit the VM LAN’s approved egress; NAT alone does not authorize forwarding.
Inside a test VM on vmbr3:
|
|
Do not interpret failed ICMP alone as proof of a routing failure; use TCP tests and firewall counters as well.
6. IPv6: design separately, don’t copy IPv4 NAT
Hetzner IPv6 allocation and routing are product-specific. If you have a routed prefix, allocate non-overlapping /64s to the networks that need them and configure explicit IPv6 forwarding and firewall rules. A single /64 cannot simply be assigned to multiple unrelated L2 bridges without a deliberate routing or proxy design.
For an IPv6-enabled vmbr3, verify the actual prefix and default route from Hetzner first. Prefer routed IPv6 to NAT66. Do not expose VM services merely because IPv6 connectivity works.
7. Management access through Cloudflare Zero Trust
A Cloudflare Tunnel can provide access to a specific management service without opening the Proxmox web UI to the public Internet. Apply Cloudflare Access policies and MFA; use a supported private-network routing method or service-specific ingress. Protect SSH separately and retain Hetzner rescue access.
Do not publish https://your-host:8006 as an unauthenticated public endpoint. Validate the complete authentication chain before restricting your existing management path. Tunnel availability does not replace emergency console access.
8. Validation matrix
| Check | Expected observation |
|---|---|
| Host WAN | Existing SSH/management path still works |
| Host → CHR-A | ping -c 3 10.255.1.2 succeeds if ICMP allowed |
| Host → CHR-B | ping -c 3 10.255.2.2 succeeds if ICMP allowed |
| CHR default route | Each router points at its own transit gateway |
| Provider-routed /32 | Inbound/outbound test uses the correct CHR, not the host IP |
| VM LAN | Gateway and DNS work; outbound traffic uses intended host NAT |
| Segmentation | CHR-A LAN cannot reach CHR-B LAN unless explicitly allowed |
| Host management | Neither CHR LAN can reach the Proxmox API without an explicit policy |
| Reboot persistence | Routes, bridges, firewall, and tunnel survive a planned reboot |
Useful read-only checks:
|
|
For negative isolation tests, use curl or nc against an agreed test port and inspect firewall counters. Avoid relying only on ping.
Rollback
If a transit route is wrong, remove only that route:
|
|
If the bridge change fails, use the Hetzner rescue console to restore the specific dated /etc/network/interfaces backup and apply the recovered configuration after inspection. Remove the forwarding sysctl only if it was introduced by this lab and no other workload depends on it. Keep the original firewall ruleset available for restoration; never flush all nftables rules on a remote production server.
What this guide does—and doesn’t—prove
This article provides a reproducible design and staged configuration examples, not a claim that the commands were executed against your server. Provider routing, CHR license and image version, Proxmox storage identifiers, nftables integration, and IPv6 delegation must be checked for each environment.
Next in the series
Part 04 — Proxmox Firewall and Network Isolation will cover explicit forwarding, anti-spoofing, SNAT, IPv6 policy, and verification with firewall counters. The NAT example above is not a complete firewall configuration.
Official references: Proxmox network configuration, MikroTik CHR, Hetzner dedicated-server networking, and Cloudflare Tunnel.